Search This Blog


Blog-Snippet Feeds


Enter your email address:

Delivered by FeedBurner

blog-snippet/blogspot.com for feedburner


Tuesday, March 25, 2014
Post Title

Create your Own Simple Slideshow & Ads

category: blogging tips

Create Simple Slide Image

Creating simple slideshow or ads for blogspot blogger is very easy. What you have to do is as follows:
  • First, Design your images.
  • Second, Store your images into blogspot host.
  • Third, Place javascript into HTML code

Let's do it!

Design your images

Here, I create two simple images by using adobe photoshop. I recommend to use Gimp (free software - open source - linux edition and gimp can run under windows) for better size and performance. Create  slides - ads as attractive as possible to attract visitors to click on slide.
Pick common size
as slide - ads size, e.g. 160 x 600, 300 x 280, 729 x 90, and the size you wish for your own blogspot blog.

Store your images into blogspot host

After finishing with image design, store them into blogspot host. Why should blogspot host? Because blogspot host is where blogspot blog is also stored. This is good for loading page. If you store images to other hosting services - provider, slideshow will take long enough to load perfectly. Besides, you can use JPG or GIF formatted images for small size to help better loading page.

How to store them

1. Login to your blogspot blog.
2. Go to layout.
3. Add new gadget & pick [Image] gadget.
4. Upload your images one by one.

After uploading one image successfully - which is browsed from your computer - do not click [back], [cancel] or [save] button. Do right click on the image & choose [Copy image location] or [Copy link location] and paste the link into notepad and then click [cancel] button. Do that every time images successfully uploaded.
Now, images has been successfully stored in blogspot host.

Place javascript into HTML code

The last episode is to place javascript code into HTML Code, as follows:
  • Go to layout & add a new gadget - choose HTML/Javascript gadget.
  • Copy & paste this following code into it.

<script>
var delay=7000 //set delay in miliseconds
var curindex=0
var randomimages=new Array()
randomimages[0]="https://blogger.googleusercontent.com/img/b/R29vZ2xl/AVvXsEh4SN7bKmwQmr_v_5So1tBUzxQ4WKPF_cQWQljaQVjRzHkbw9ERvZlDZzfBq34XybxblPls6GWBNcuf1GC6zqzlNAHrdQBF9w659rltImvtycbg4RT7yV29yfV2_dEggspLpUMkereVtzIx/s1600/ads1.png"
randomimages[1]="https://blogger.googleusercontent.com/img/b/R29vZ2xl/AVvXsEiVuAuU-Cd-526j3oToWKIt8SoXi09lCAn9Q3mPVBap1uCmgoGJBdNP2CRwmnBQFjJxi2fmII5N4YG_cusYGu8olW18l51nkNE-WMAbIwYqhTRvJ93qERNaeCoSC8METCkGwS6t57MnDJF_/s1600/ads2.png"
var preload=new Array()
for (n=0;n<randomimages.length;n++)
{
preload[n]=new Image()
preload[n].src=randomimages[n]
}
document.write('<img name="defaultimage" src="'
+randomimages[Math.floor(Math.random()*(randomimages.length))]+'">')
function rotateimage()
{
if (curindex==(tempindex=Math.floor(Math.random()*(randomimages.length)))){
curindex=curindex==0? 1 : curindex-1
}
else
curindex=tempindex
document.images.defaultimage.src=randomimages[curindex]
}
setInterval("rotateimage()",delay)
</script>

  • Find this following script in that javascript code:
randomimages[0]="https://blogger.googleusercontent.com/img/b/R29vZ2xl/AVvXsEh4SN7bKmwQmr_v_5So1tBUzxQ4WKPF_cQWQljaQVjRzHkbw9ERvZlDZzfBq34XybxblPls6GWBNcuf1GC6zqzlNAHrdQBF9w659rltImvtycbg4RT7yV29yfV2_dEggspLpUMkereVtzIx/s1600/ads1.png"
randomimages[1]="https://blogger.googleusercontent.com/img/b/R29vZ2xl/AVvXsEiVuAuU-Cd-526j3oToWKIt8SoXi09lCAn9Q3mPVBap1uCmgoGJBdNP2CRwmnBQFjJxi2fmII5N4YG_cusYGu8olW18l51nkNE-WMAbIwYqhTRvJ93qERNaeCoSC8METCkGwS6t57MnDJF_/s1600/ads2.png"

When there are two images, just replace the URL with URL you kept on notepad in randomimages[0] & randomimages[1] . If the images are more than two, add & type the index randomimages[0],[1],[3] .... and paste images URL into it, as follows:

randomimages[0]="your-image-url1"
randomimages[1]="your-image-url2"
randomimages[2]="your-image-url3"
randomimages[3]="your-image-url4"
randomimages[..]=".........................."

Do not forget to setup the slide speed - delay. Find this script: var delay=7000 //set delay in miliseconds. Change [7000] into other - as you wish. Finally, save your work & done!
Sunday, March 23, 2014
Post Title

SEO: Definition and Analysis

category: blog optimization
SEO stands for Search Engine Optimization. Optimization is synonymous with the process--wp of optimizing - blog - in Internet Search Engine. Why should be optimized?.

SEO & Problem

Basically, SEO does not talk about ranking. Ranking refers to the result - of optimization process. Optimization process is the core point towards the visibility of a blog in internet search engine. Thinking how to reach the highest ranking will change the point of view of the real purpose - the process - where mostly bloggers will tend to be more incoherence to think how to reach the target and how to do it. Further, process includes some methods implemented about what steps or how to do - in this case - how to be more visible in internet search engine. That is what makes Google suggests to do some research since SEO is a big decision that can potentially improve blog (visibility.blog-snippet) and save time, but bloggers can also risk damage to their blog and reputation.

From the description above, SEO is a process. When visibility of blog is reached in SERPs (Search Engine Result Pages), does SEO stops at that time? the answer is no. SEO then requires continuously process of continuous research and to survive. Twitter currently gets the most visible in SERPs - in Google pages and in Social Network Scope - but Facebook can also reach later and precedes twitter. SEO is dynamical thing, not static.

How Visible Are (Blogspot Blog) You in SERPs ?

Take notice that All blogs can reach the most visible in search engine. Visibility in SERPs is about Scope. Scope means niche or main ideas of your blog. From here, bloggers can compete each other based on their own niche. That means that all bloggers have chance to be more visible. Why don't you start now?
Google actually has given his bloggers how to SEO for blogspot blog. This means that Google still commits to blogger.com. You can get the PDF which contain simple guide how to start to learn SEO for blogger.

To start to learn about SEO, you should start to create a new blogspot blog with gmail. Before deciding everything, you must determine 4 points to think & to decide:

1. What scope? - what topic - what niche?
2. The relevancy of blogspot blog title, description & content.
3. How often do you update your best & unique article?
4. Keyword research (keyword density)

Forth starter should be your first priority before starting to go further. Those are going to discuss later.
"Let me tell you that I had many blogs. 80% were useless. It was because I did not pay close attention to the blogs. What I found was nothing but tiring, boring and annoying".

Friday, March 21, 2014
Post Title

More Than Just Blogging

category: blogging tips
Bloggers could be a blog's owner and author at the same time. You should show your identity clearly in scripting as blog owner, author & publisher (when no others manage the blog). As blog author, add Google+ Profile URL+ID inside your blog tag head. To see your Google+Profile URL+ID, first log into your Gmail, type plus.google.com in your browser URL box. Then, click on [Home] menu > [Profile]. The URL+ID is displayed in the browser URL box. It looks like this:

https://plus.google.com/xxxxxxxxxxxxxxxxxxxxx/posts, where Your Google+ Profile URL+ID is https://plus.google.com/xxxxxxxxxxxxxxxxxxxxx

When you have copied it then go to your blogspot and place your Google+ID Profile inside tag head, as follows:

<head>
.......
<link href='https://plus.google.com/xxxxxxxxxxxxxxxxxxxxx' rel='author'/>
......
</head>

Now, you, as blog author has been successfully added.
Futhermore, you should add your Google+ Page to indicate that you are the blogspot's publisher.

To create new Google+ Page, log into your Gmail or Profile (as in, above), From [Home] menu, click on [Page]. Click on blue button [Create a page]. After that, pick one of the page displayed based on your blogspot blog's topic/Niche.

On a "Create a Google+ Page, type your Page Name and add your Blogspot blog's link/URL into "List your external website, if you have one" box. Click [Agree] and [Continue] button.
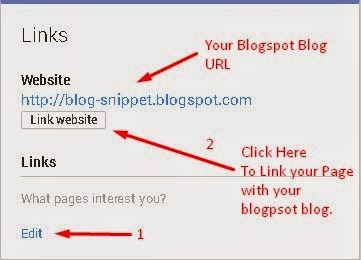
After the page has been successfully created, click on [Edit page] button and find LINKS on the page.

See this following pic.

How to link your blogspot blog with your Google+ Page

Then, click on [Link website] button below your blogspot blog's URL, as in the pic above.
When you have done with this, reload the page or press F5 on your keyboard & this following pic will be displayed. Just click on [Get URL] button to change your Page ID (in number format) with unique one.

How to customize your unique Google+ Page URL


Add your extension page name, click [Change] & [Confirm]. Your Google+ Page finally appears at seconds. What you have to do then is to copy the URL inside your tag head, as follows:

<head>
.......
<link href='https://plus.google.com/+your-google-page-unique-name' rel='publisher'/>
......
</head>

From the description above, we finally realize that blogging with blogspot blog is not just to get blogging, but it is more than just blogging.
Tuesday, March 18, 2014
Post Title

Blogging: Blogspot Blog

category: blogging tips

Blogspot Blogger


Blogging is fun. Blogging gives us new experience how to express our idea in internet - the widest network in the world - where other bloggers gathers to share, to learn how to blogging with blogspot blog, scripting, optimizing and earning. Why Blogspot? The first answer is that Blogspot is easy for new bloggers who do not have any programming knowledge to start to create a new blog and post their unique articles in 15 minutes.

What is blog?

Based on wikipedia - written by rebecca in related to one of her essay: weblogs: a history and perspective - http://www.rebeccablood.net/essays/weblog_history.html - blog is a truncation of the expression web log. Blog tends towards to many articles posted by blog's author (log) & identified as personal web where author logs were fully written. Nowadays, blog extends into global comprehensive site which is managed by, even, a professional author. However, there must be something to differ a blog belongs to blogspot dot com and others, e.g. wordpress, etc. Here, blog-snippet.blogspot.com calls "Blogspot Blog" for blogger.com.

What Blog-Snippet does with this blog

Further, the use of blog according to what Rebecca said is to store author's log in internet. It then contains some notes or agenda where guests can submit comments to the author. In line with the expansion of blog uses, blog-snippet.blogspot.com intends to use this blog is to share:
  • Blogging Tips
  • Scripting HTML & CSS in Blogspot Blog
  • Blog Optimization
  • Earning Tips for Blogger
Blogging Tips discusses about Tips to manage Blogspot blogs as Google suggests to bloggers. All issues in concerned to Blogspot blog will be discussed in here.
Scripting HTML & CSS in Blogspot Blog will take HTML5 and its page elements as blog-snippet's library as well as CSS Level 3 which validator.w3.org as the validator.
Blog Optimizing talks about how to optimize (Learning SEO) Blogspot blog in related to SERPs (Search Engine Result Pages) - Blog Visibility, including Google Rich Snippet, Meta/Robots, Redirection, Error 404 Page, Robot Header Tags and Google ranking, backlink and to find out why blogs penalized by Search Engine, specially Google Search Engine.
Earning Tips for Blogger talks about tips to make money online through your own Blogspot Blog.

Besides, blog-snippet also provides other Blogger's needs in blog-snippet's library.
All discussion and comments are welcomed through Google Forum and Google+ +Hartini Jayadi Rahman.
At last, Me, Hartini Jayadi Rahman would like to say thanks so much for all kind Blog-snippet's visitors/readers.

Best Regards,
Blog-Snippet's Author. 2014